October 30, 2012

fall session: farro


Farro was our second focus in The Family Table grain series.  Farro dates way back to pre-Roman times (farro grains have been found in Pharoah's tombs) where it was a major food staple.  Farro has a similar flavor to brown rice, but has a nuttier taste.  It has a very low gluten content and can often be eaten by those with a gluten intolerance (although after making a yummy farro risotto for a gluten free friend, I found out it is not totally gluten free, sorry Tracy).  Farro is rich in fiber, magnesium and vitamins A, B, C and E. 

Farro is very easy to prepare:
If you think of it, soak the farro in water over night.  This will give you a head start on the cooking process, although it is not crucial.   Put the drained (or dry if you did not soak) farro in a pot and cover by a couple of inches with water and a good pinch of kosher salt.  Bring to a boil.  Lower the heat to a simmer and put the top on, stirring occasionally.  Non soaked farro takes about 30 minutes for an al dente taste.  If you soak it first, plan to cook it about 20 minutes.  Drain the farro and stop the cooking process by putting it under cold water until cooled.  It is ready to pop into a green salad, or use it for many farro salad recipes. 

In class, we made a farro "soup" with red wine, chicken sausage and mushrooms.  It was very hearty and when I swirled in truffle oil before serving, it made a very rich and lovely meal for a winter evening.  Please enjoy the soup and some other recipes I recommend:


This is really delicious.  Perfect to accompany a simple seared or grilled filet of fish.


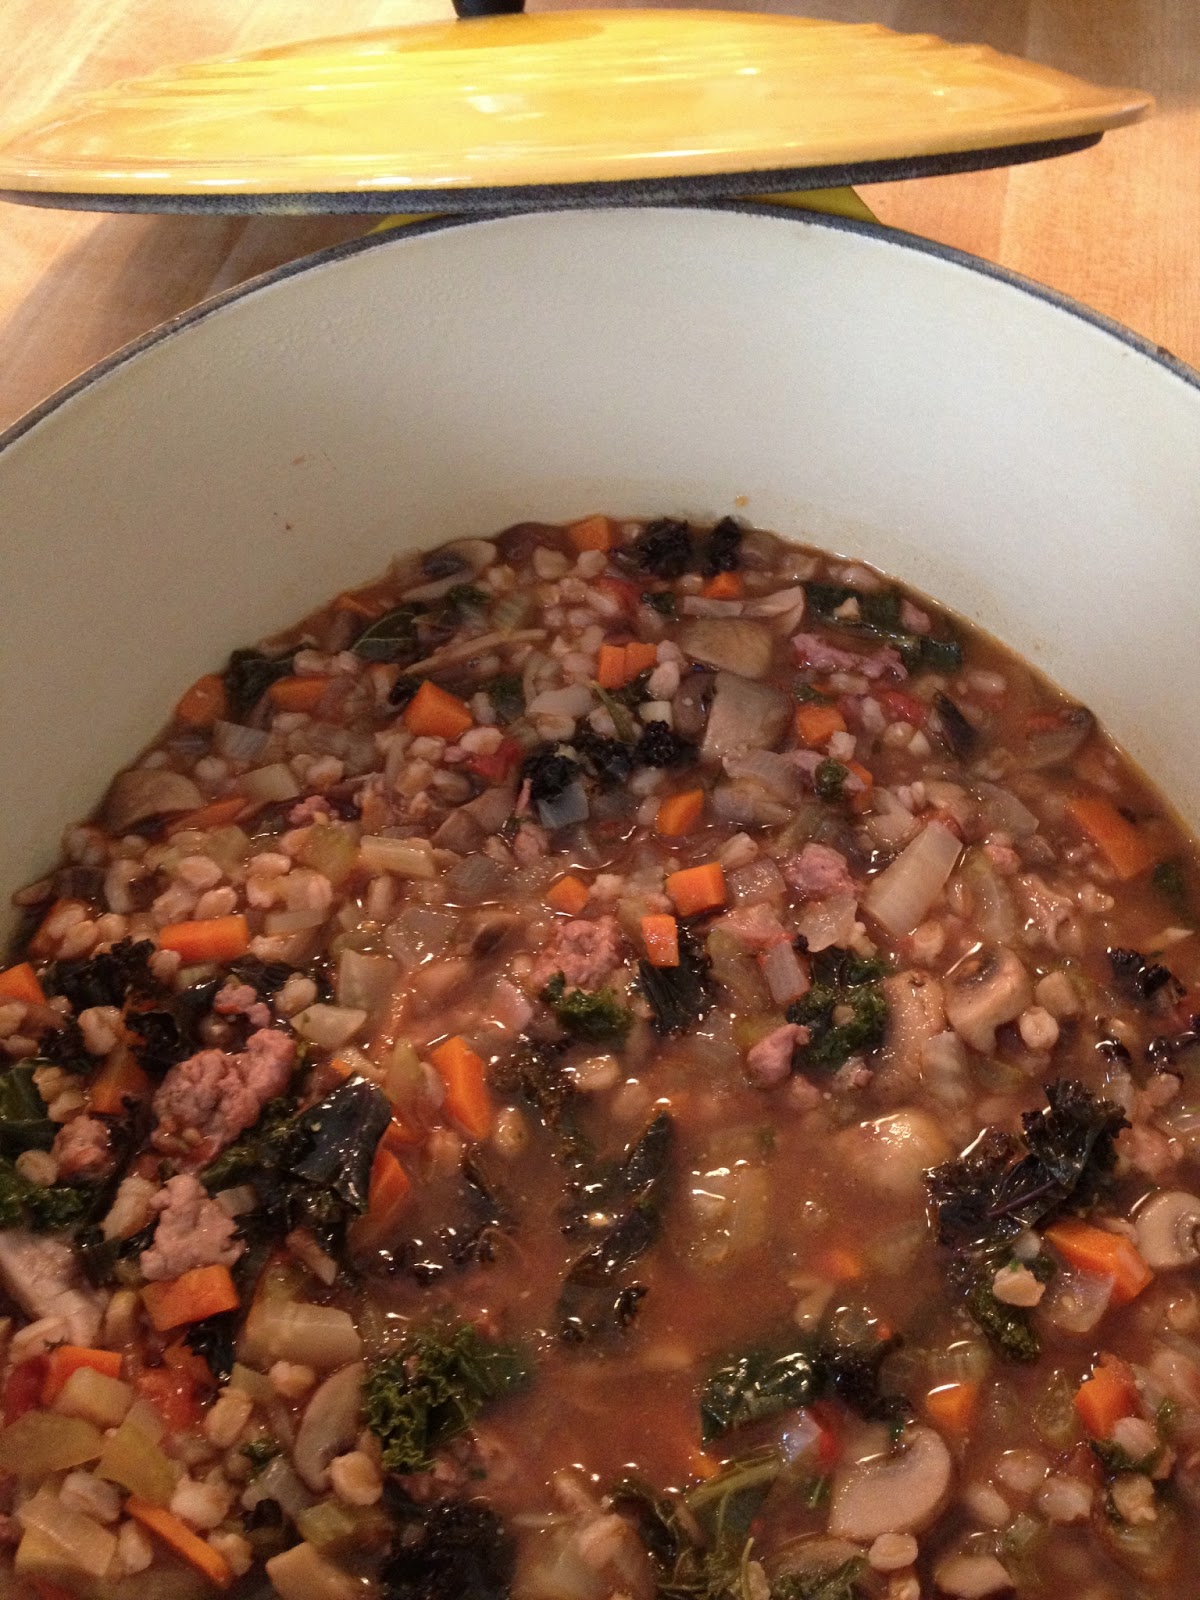
This is a nice hearty vegetarian meal.  Easy to make a big pot of and freeze the unused part.  I like to freeze my soups and stew in ziploc freezer bags labeled with the name and freezing date.  I am looking into freezing things in quart wide mouthed canning jars.  Thinking that is an improvement as it elminates the plastic component and makes for easy defrosting in a hot water bath.  Often when I defrost ziploc bags in warm water, I spring a leak.  Let me know if anyone has any tips on can freezing.

Additionally, following please find some farro recipes that I have not yet tried but am hoping to soon.  Let me know what you think if you get inspired to try them out.

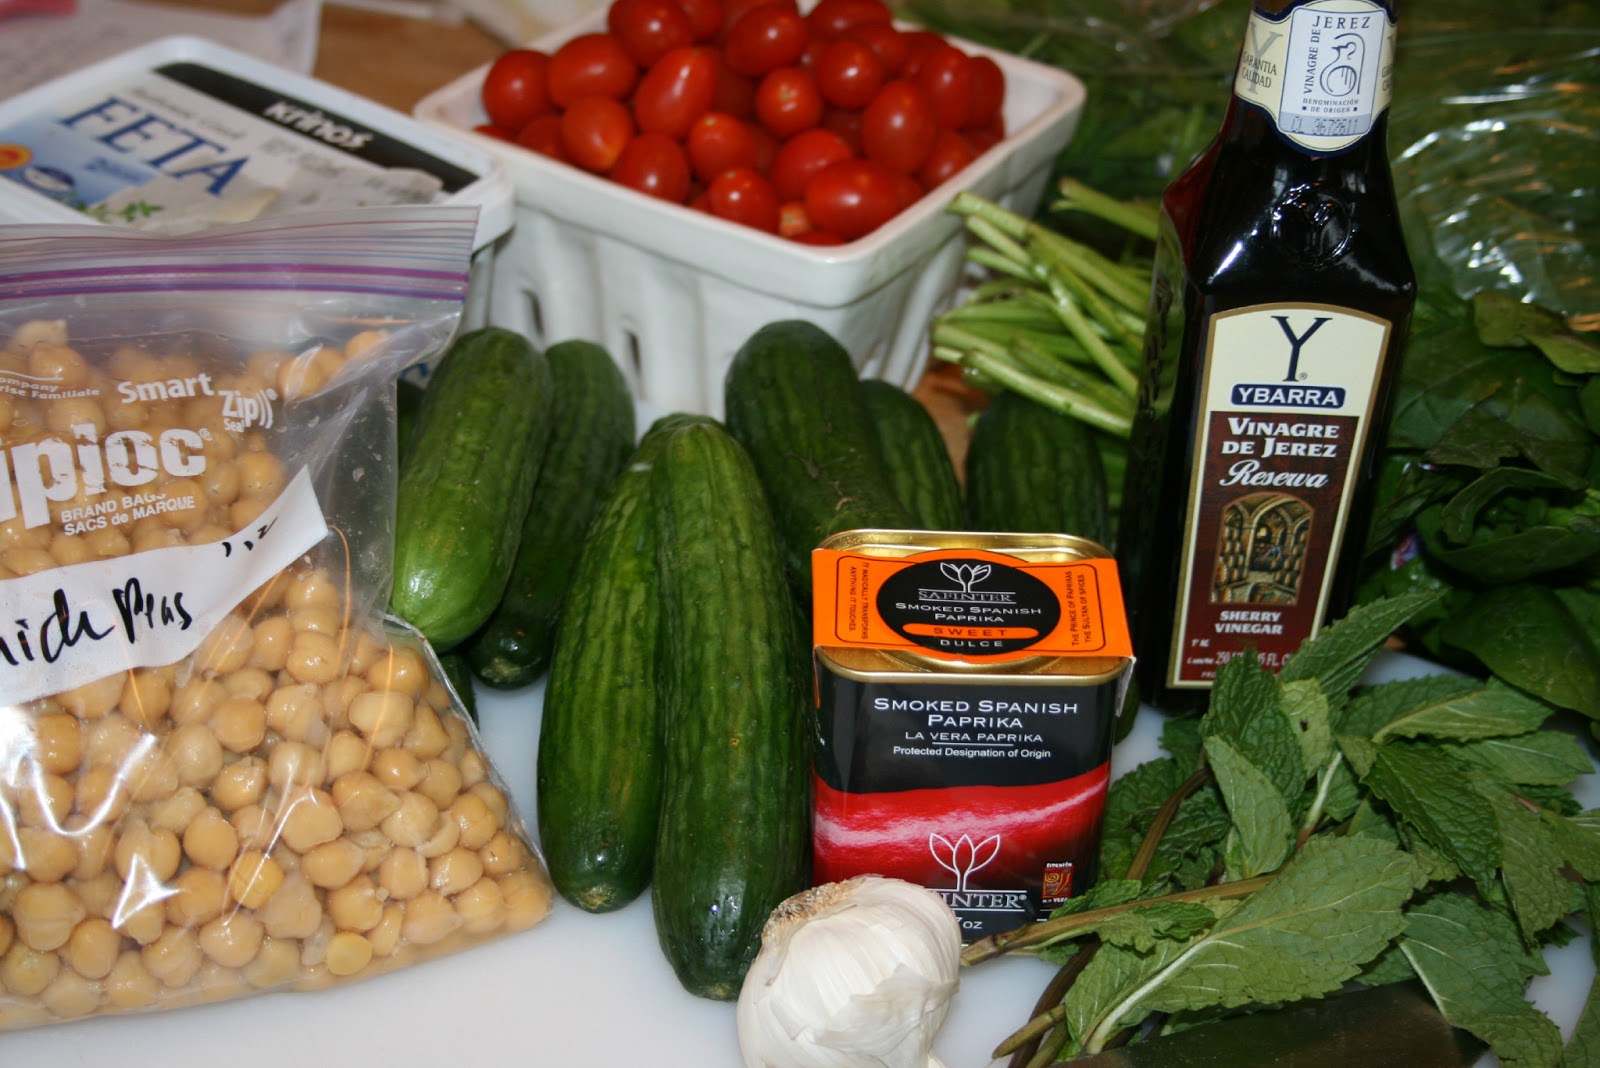
Farro and herbs salad, a lunch salad or good with maybe seared salmon or chicken:
http://www.101cookbooks.com/archives/farro-herbs-recipe.html

A crisp, nice salad:
http://honestfare.com/bean-farro-salad-with-cilantro-apple-dressing/


And lastly, before i lose your attention:
http://www.vegetariantimes.com/recipe/warm-farro-pilaf-with-dried-cranberries/

A great article on farro, including a very good risotto recipe.  I added some shredded chicken thighs, mushrooms and spinach to my farrotto and topped with some cheese and truffle oil, it was delicious:
http://www.theatlantic.com/health/archive/2011/01/fresh-recipes-with-an-ancient-grain-4-ways-to-prepare-farro/69313/


Follow Me on Pinterest

October 23, 2012

fall session: quinoa


The Family Table's fall season has started!  
(We always start with a breakfast treat and a cup of coffee.  These are quinoa carrot muffins.)

The focus of this session is grains: quinoa, farro, bulgar and barley specifically.  Last week, I gathered with five others to talk, chop, saute and share, while focusing on the taste and versatility of quinoa. Quinoa is a complete protein.  Excellent for vegetarian diets looking to maximize protein in their diets.  Quinoa actually dates back some 3-4,000 years to the Andes mountains.  It is high in amino acids, calcium, iron, magnesium and fiber.  It comes in white, red, black and rainbow.

How to Boil Quinoa:
  • Rinse the quinoa, then put it in a pot (if you buy "pre-rinsed quinoa you can skip the rinsing step)
  • Top the quinoa with water, covering by a couple inches.  Salt.
  • Bring to a boil.
  • Turn the heat down to a simmer, cover the pot.
  • Cook until it is to your liking.  This usually takes about 20-25 minutes, you will see the "curlicue" emmerge from the grain.  Test it, it is done when it is soft.
  • Drain the excess water out.
At this point you can use your quinoa for salad recipes, or as a side.  Mark Bittman suggests some great mix-ins in "The Food Matters Cookbook": olive oil, butter, any flavor pestos, fresh chopped herbs, dried fruits, sauteed mushrooms, onions, garlic, assorted spices such as cumin, coriander, chiles, saffron, turmeric, whatever you have on hand that you love.

How to Steam Quinoa:
(method thanks to Ellen King)
  • Rinse the quinoa, then put it in a pot (if you buy "pre-rinsed quinoa you can skip the rinsing step)
  • Top the quinoa with 1 1/3 the amount of water as quinoa (ie. 1 C. quinoa, 1 1/3 C. water).  Salt.
  • Bring to a boil. Boil for about 3 minutes. 
  • Cover the pot, turn off the heat and let steam for about 20 minutes.
  • The quinoa is ready to use, no draining needed.

Cook a whole box.  Eat what you need and then make quart ziploc bags of the remaining and freeze.  Remember it is there, and then take it out and use as an accompaniment to stews, mix in for soups, use in a stirfry, the list goes on...

We made Quinoa Cakes, adapted from a wonderful nutritional vegetarian blog, 101 Cookbooks.
These are really tasty, satisfying vegetarians and carnivores alike (they make people think they are crab cakes).  In class, we cooked them up, made a simple marinara sauce with sauteed eggplant, then grated smoked mozzarella cheese for the top.  We did learn that it is best to saute them right before eating, they do not heat up well (texture suffers).  Once they are in patties, you can keep them in the fridge until saute time, or put them in the freezer for a future quinoa meal.  Just take them out to defrost the morning you plan to serve them.


Then we made a delicious composed quinoa salad with chicken, dried cranberries, cumin, lime juice carrots and greens. 


And another yummy quinoa salad with cucumbers, chickpeas, spinach, mint, feta and a smoked paprika dressing.  I had never used smoked paprika.  It is such a lovely and rich spice (available at the Evanston Spice House). Quinoa is so versatile.


Follow Me on Pinterest

October 02, 2012

in the garden...canning tomatoes


Last week, with the help of Laura Bougher of The Glass Rooster, we canned 24 quarts of tomatoes fresh from the YWCA's Urban Garden (supplemented by some beefsteak tomatoes from Ed, the generous farmer from Gast Farms-great sausages-at the Evanston Farmer's market).

Laura is a fantastic teacher, demystifying the process, making you feel equipped to tackle it on your own.  Actually, I have gathered some neighbors and we are putting up our own tomatoes tomorrow afternoon.  Fresh garden grown tomatoes, ready to pop into winter stews and soups, I am so excited.

Here is my summary of the canning process:

Clean your jars, wide mouth quart jars are great for tomatoes.  Either sterilize in boiling water, or put through your dishwasher on the sanitizing wash.

Fill your canner half full with water and start boiling (this part is very easy to underestimate and you can be watching a pot for a long time).  Place your cleaned tops and lids in boiling water to sterilize.

Prepare your tomatoes by cleaning them and then blanching them to remove their skins.  Get another big pot of boiling water, and a big bowl of ice water ready.  When the water is boiling, drop the tomatoes into the water for less than a minute, you just want the skins to loosen or crack a bit.  Then, scoop them out with a slotted spoon and put immediately into the ice water.  You should be able to peel the skins right off.

At this point, you can either leave the tomatoes whole, or halve or quarter the tomatoes.  I prefer mine quartered as since you are going through all the mess now, better to have them ready to pop in stews and soups later.  Once quartered, pop them into a stainless steel saucepan and bring to a boil over medium high heat.  Using a masher, mash some to get a good amount of juices.  Let them boil gently for 5 minutes.

If your tomatoes are ripe, you should use citric acid (a natural preservative) or bottled lemon juice to ensure their acidity level is safe for canning preservation. The bacteria that can produce botulism thrives on low-acid foods in an airless environment.  Tomatoes sit on the borderline of low and high acid foods, so adding acidification will make them safe.   For a quart of tomatoes, use 1/2 tsp of citric acid or 2 Tbl. of lemon juice, either works, depends on your personal taste.  Put the acidic ingredient in the jar before adding the tomatoes.

Using a canning funnel (wide enough to allow solids to pass through), fill your clean sterilized cans with your peeled and chopped tomatoes, leaving a 1/2 inch head space.  Using a butter knife or a chop stick, poke around in the can to eliminate any air bubbles,  topping off with tomato liquid to fill.  Clean the jar rims with a damp cloth.  Place a sterile lid on the jar and then screw on a band until it just gives but not too tight (finger tip tight).

Place the sealed jars in the canning rack and then slowly lower into the boiling water (letting the jars acclimate to the hot water temperature).  The cans should be covered by about an inch.  Bring the water back to a boil, cover, and continue boiling for 45 minutes for tomatoes.  Remove the pot lid, wait about 5 minutes, then remove the cans, let cool on dishtowels.

Once the jars have cooled (about 8 hours), check the lids: if it is concave and does not give when you press it, it is sealed.  You should have heard the cans popping as they sealed.  Wipe clean the jars and rims and store.


Follow Me on Pinterest
Related Posts Plugin for WordPress, Blogger...